St Patrick’s Day Twice Baked Colcannon Potatoes
- Where In The World People Are The Most Interested In Remote Work? - 06/03/2023
- Cleaner Streets And Increased Flexibility For Merton Residents - 03/03/2023
- The legendary and critically acclaimed rapper, producer and songwriter releases a brand-new vocal adaptation ofJengi’s viral sensation Bel Mercy - 03/03/2023
St Patrick’s Day Colcannon Potatoes
The perfect dish for St Patrick’s day, is this party in a potato! It’s the perfect mash-up between creamy mashed potato and a crispy, crunchy jacket spud. Trewithen Dairy went for a twist on a colcannon – salty bursts of bacon, buttery potato and cheese for proper winter comfort food.
Ingredients
3 Large Floury Baking Potatoes
Vegetable Oil
Sea Salt Flakes
100g Trewithen Dairy Salted Butter
75g Trewithen Dairy Cornish Clotted Cream
4 Rashers, Smoked Bacon, sliced into lardons
4 Spring Onions, sliced thinly
1 Large Bunch of Kale, washed and roughly chopped
50g Cheddar Cheese, grated
Salt and pepper
Method
Preheat oven to 190c.
Prick potatoes all over and place on a baking tray. Coat all over with oil, then sprinkle generously with sea salt flakes. Bake for 1 hour, or until cooked through. Remove from the oven and allow to cool.
Increase oven temperature to 220c.
When the potatoes are just cool enough to handle, slice them in half lengthwise and carefully scoop the filling into a bowl, taking care to leave the skins intact. Place the skins back onto the baking tray.
Melt the butter in a frying pan over a medium heat and add the bacon lardons. When they are golden brown, add the kale and cook for a couple of minutes. Pour the buttery mixture into the bowl of mashed potatoes. Stir through until thoroughly combined, before adding the clotted cream and spring onions. Season to taste, bearing in mind the bacon will also add saltiness.
Carefully spoon the filling back into the potato skins. Sprinkle with cheese, then return to the oven for 10 or so minutes, or until the cheese has melted and the potato skins are gloriously crispy.
Enjoy with a side of kimchi for a spicy contrast.
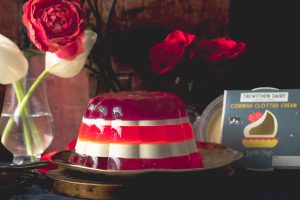
Rainbow Clotted Cream Jelly
This quivery pudding is an explosion of colour – the perfect showstopper for Mother’s Day, especially when the guest of honour is young at heart. Who doesn’t love a dancing, wibbly-wobbly jelly? When guests ask you how it’s made, there’s only one response. “Magic.”

Ingredients
Vegetable Oil for greasing
3 Packets Fruit Jelly
200g Trewithen Dairy Cornish Clotted Cream
200g Double Cream
3tbsp Caster Sugar
1 tsp Vanilla Extract
1 Sachet (12g) Powdered Gelatine
Method
You’ll need a 1 litre jelly mould and a separate cup. The cup works well for you to gently prod to check if the layers are set enough and to use as a testing ground for pouring in the next layer. Grease both with a thin layer of vegetable oil.
Make your first jelly up in a jug. Use 100ml less water than the packet instructions so it sets a little firmer. Pour a layer into the jelly mould and cup, ensuring you pour directly into the bottom of the vessels – always keep the sides clean so you end up with clear stripes.
Place the vessels carefully in the fridge and set a timer to check them in 20 minutes. You want them to be set just enough to hold the next liquid – not firm. In the meantime, make your next layer up allowing time to cool slightly.
While the jelly is setting, make up your clotted cream layer. In a saucepan, gently heat the double cream, sugar and vanilla. When the sugar has dissolved, spoon in the clotted cream and combine until smooth. Add the powdered gelatin and stir through. Remove from the heat and allow to cool – you can speed this up by pouring the mixture into a jug, then placing the jug in a saucepan of cool water.
When the jelly is firm enough to support the next liquid, it’s ready. Always pour over the jelly in the cup to check the colours don’t seep through – the cup is your test pad.
Gently pour some of the clotted cream mixture over, taking care not to touch the sides.
TOP TIP: Pouring the jelly down the back of a spoon helps to lessen the impact when you pour it.
Allow to chill until it is set just enough to support the next layer – checking the cup first each time.
Repeat the process, separating the jelly colours with a layer of clotted cream mixture. If your jug of clotted cream starts to set in between, place the jug in a saucepan full of tepid water to keep it loose enough.
When you’ve finished, allow the jelly moulds to completely set in the fridge. When you’re ready to turn them out, fill a saucepan with boiling water. Carefully dip the jelly moulds into the water three times, before placing a plate on top of the mould and flipping it upside down. If the jelly doesn’t slide out easily, continue to dip the mould into boiling water and squeeze the mould until it comes out.


